Access Services Using Tailscale
This section will guide you through the installation process of Tailscale and using it to access AnyShake Services.
Overview
When accessing AnyShake services remotely, exposing ports directly to the public internet is not recommended due to security risk. A private VPN allows you to access services as if all your devices were on the same local network, without opening any ports to the outside world.
Tailscale is a mesh VPN built on top of WireGuard that creates a secure, encrypted network tailnet between your devices. Each device gets a private IP address, and traffic is end-to-end encrypted. This makes it well-suited for securely accessing self-hosted services such as AnyShake from anywhere.
While this guide uses Tailscale as an example, similar results can be achieved using other mesh VPN or private networking solutions, including:
- ZeroTier – Software-defined networking with virtual LANs
- NetBird – Open-source WireGuard-based mesh VPN
- Headscale – Self-hosted Tailscale control server
- WireGuard (manual setup) – Direct peer-to-peer VPN configuration
The choice of solution depends on your preferences and infrastructure. The steps below focus on Tailscale due to its ease of setup and broad platform support.
Supported platforms
- Android (arm64)
- iOS / iPadOS / tvOS (arm64)
- macOS (amd64 / arm64)
- Windows 7 and later (x86 / amd64 / arm64)
- Linux (x86 / amd64 / arm / arm64 / ppc64le / riscv64 / s390x / mips / mips64 / mips64le / mipsle / loong64)
- FreeBSD (amd64 / arm64)
- OpenWrt (mips / mips64 / arm / arm64 / x86 / amd64)
- Synology / QNAP / ASUSTOR NAS (x86 / amd64 / arm / arm64)
Create a tailnet
- Go to tailscale.com and select Get Started.
- On the Sign up with your identity provider page, log in using one of the available providers.
- On the Welcome to Tailscale page, choose either Business or Personal use.
- When prompted to add devices, follow the Installation instructions below to add at least two devices to your tailnet.
- Once you reach the Done! Your devices can now connect from anywhere page, test the connection from one device using the
pingcommand.- If it works, your tailnet is ready.
- If it doesn’t, click Troubleshooting and follow the official instructions.
If you sign up using a custom-owned domain, Tailscale automatically enrolls you in the Enterprise plan for a 14-day trial. If you sign up using a public domain email account like @gmail.com, Tailscale automatically enrolls you in the Personal plan, which allows 3 free users, 100 devices and many features from the Enterprise plan. For details go to Modify billing.
Installation
Downloading the binary
During the process of adding your 2 devices, you can directly download the binaries provided in the installation process, however if you already have a tailnet or your operating system is not on the list, you can directly download it from the Tailscale Packages page.
For Linux users
To download Tailscale on a Linux device, you can simply execute the following command (alternatively you can directly download it from Tailscale Packages):
$ curl -fsSL https://tailscale.com/install.sh | sh
After that log in to start Tailscale using the command:
$ sudo tailscale up
This command will give you a link which you can simply open in your browser and log in.
If you want Tailscale to automatically open on startup, execute the following command:
$ sudo systemctl enable tailscaled
If you want to run Tailscale in userspace mode start it using the following command:
$ sudo tailscaled --tun=userspace-networking
For Windows users
To download Tailscale on a Windows device, you have to download the binary either provided in the sign up process or from Tailscale Packages
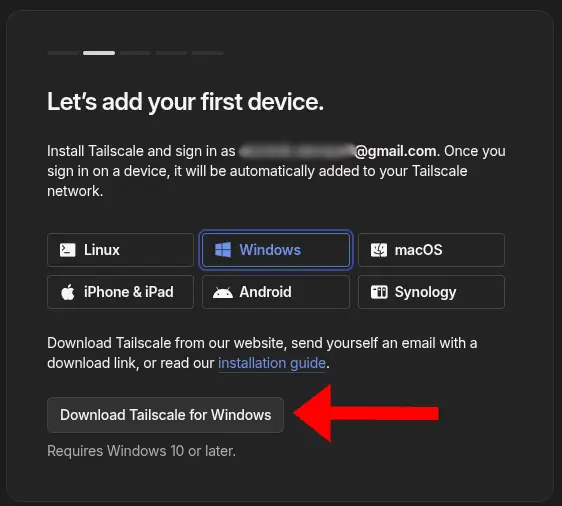
Open the file, check I agree to the license terms and conditions and click Install.
Once you're in the Welcome to Tailscale page, click Get Started.
After that, the app should open the Join your network page, where you have a button Sign in to your network, clicking that button should open a Sign in page in your browser.
After signing in you should see a text Login successful.
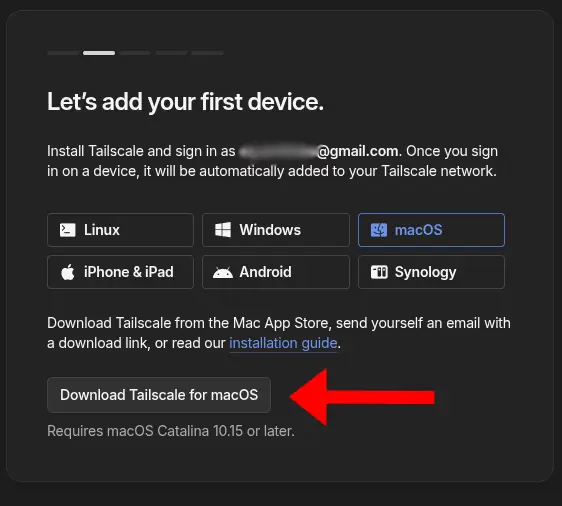
For macOS users
To download Tailscale on a macOS device, you can download it from Mac App Store or from Tailscale Packages or from the binary given during the sign up process.
If you didn't install it from Mac App Store open the file, and follow the displayed installation instructions, after that a new app called Tailscale should be installed on your device.
Once you're in the Welcome to Tailscale page, click Get Started.
The app may ask for permission to Allow VPN configuration, if that happens allow it.

After that, the app should open the Join your network page, where you have a button Sign in to your network, clicking that button should open a Sign in page in your browser.
After signing in you should see a text Login successful.
It may also ask whether you want to start it on log in, if you do want it to start it on log in automatically click Yes, start on log in, otherwise click No I will manually start Tailscale.
After installation you should be able to access any service exposed to your LAN or directly to the Tailscale IP address via the IP address given to your device on Tailscale.
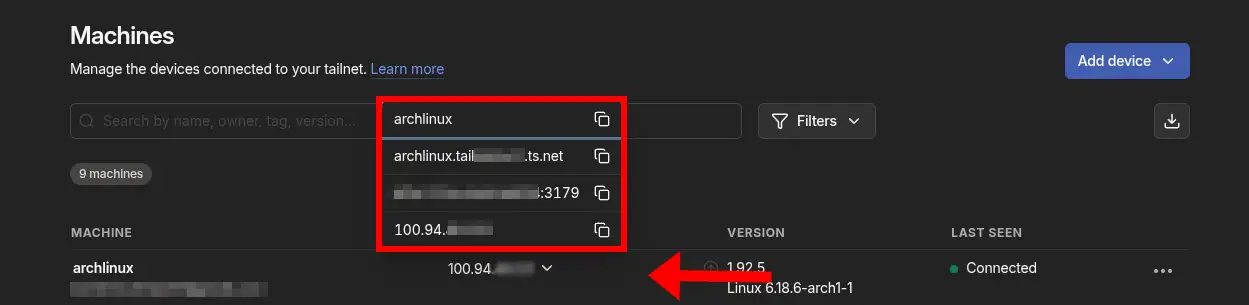
Finding the IP of your device
You can find the IPs/urls with which you can access your device in the Online Tailscale Admin Dashboard.
Remotely accessing AnyShake services
After the whole process is done, anything exposed to 0.0.0.0 or the IP of your device given in the Tailscale dashboard, will be accessible through any connected device.
For example, if AnyShake is running on 0.0.0.0:8080. You can access it remotely using <tailscale-ip>:8080 or the device’s MagicDNS name (ex. raspberrypi)